목차
프로젝트 생성
요구사항 분석
상품 도메인 개발
상품 서비스 HTML
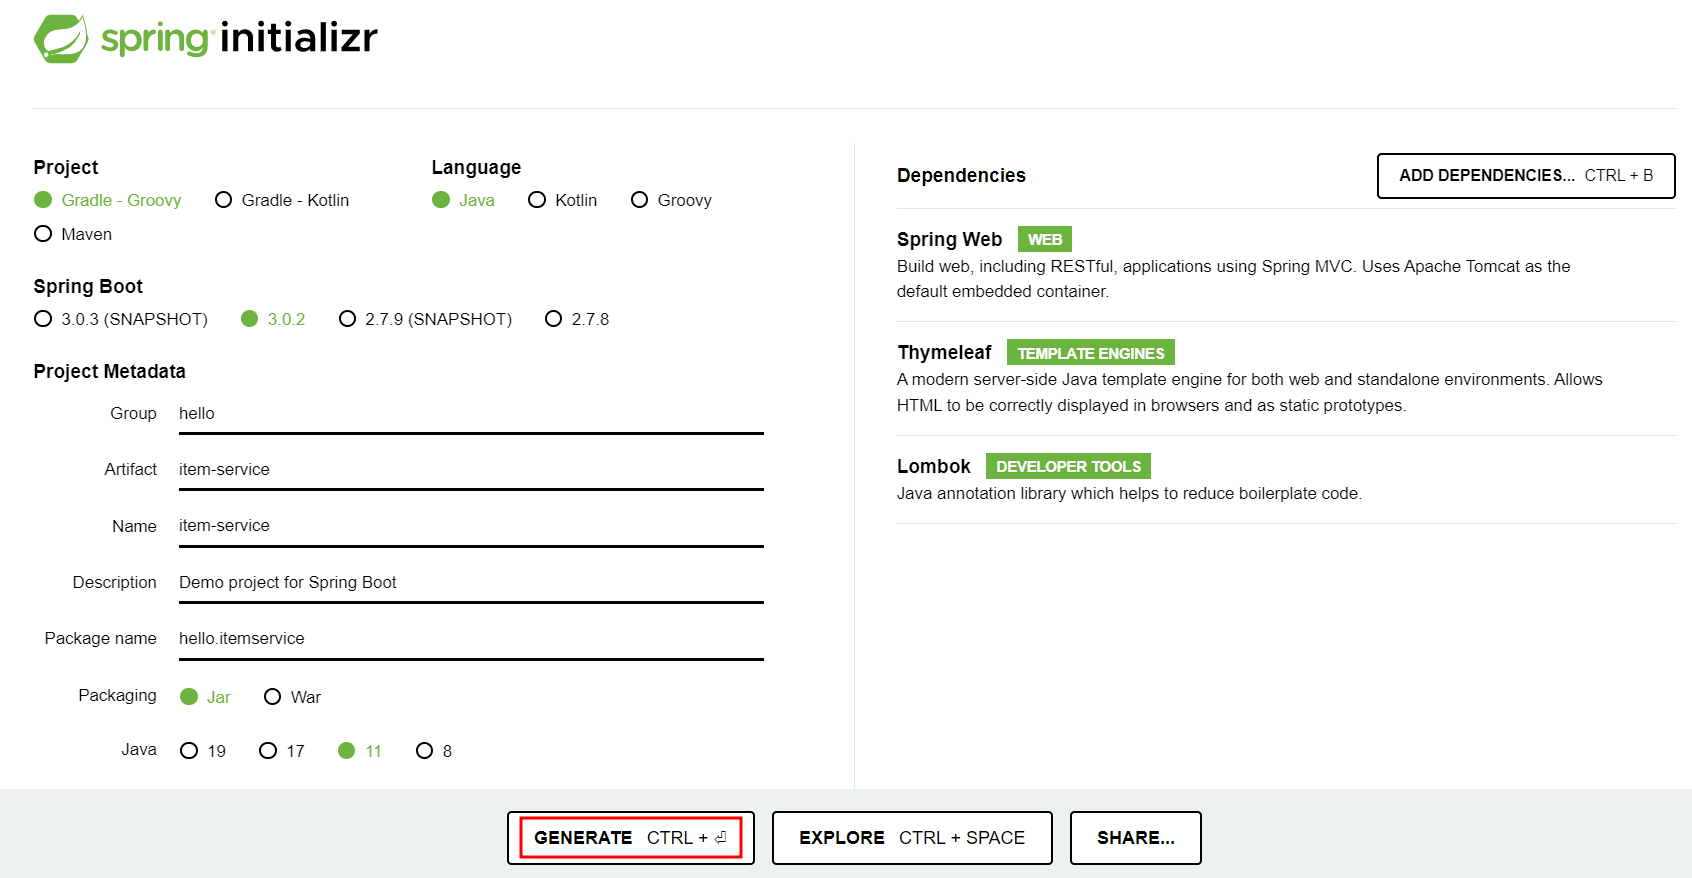
프로젝트 생성
스프링 부트 스타터 사이트로 이동해서 스프링 프로젝트 생성
https://start.spring.io

build.gradle
plugins {
   id 'java'
   id 'org.springframework.boot' version '2.4.3'
   id 'io.spring.dependency-management' version '1.0.11.RELEASE'
}

group = 'hello'
version = '0.0.1-SNAPSHOT'
sourceCompatibility = '11'

configurations {
   compileOnly {
      extendsFrom annotationProcessor
   }
}

repositories {
   mavenCentral()
}

dependencies {
   implementation 'org.springframework.boot:spring-boot-starter-thymeleaf'
   implementation 'org.springframework.boot:spring-boot-starter-web'
   compileOnly 'org.projectlombok:lombok'
   annotationProcessor 'org.projectlombok:lombok'
   testImplementation 'org.springframework.boot:spring-boot-starter-test'
}

tasks.named('test') {
   useJUnitPlatform()
}
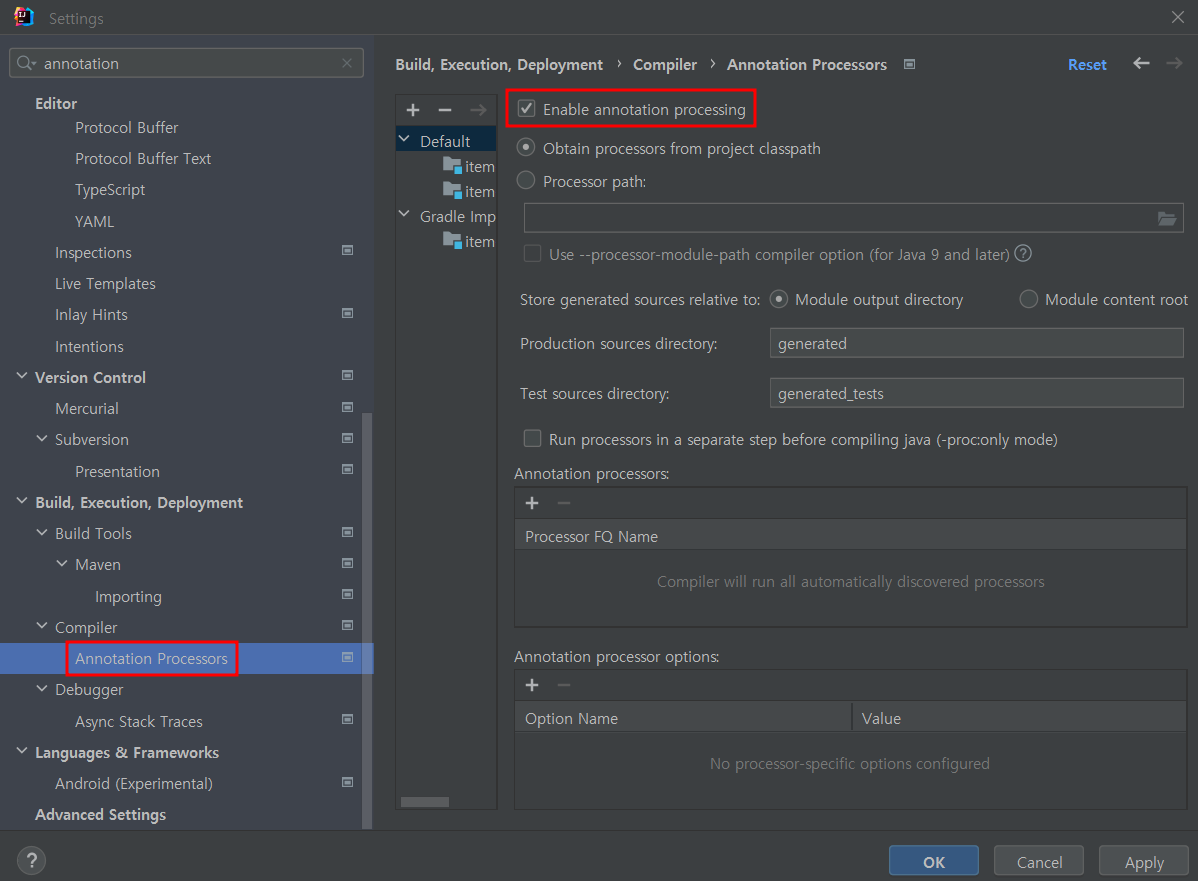
[File] - [Settings] - [Annotation Processors]
Enable annotation processing 체크해주어야 lombok 정상 작동 됨

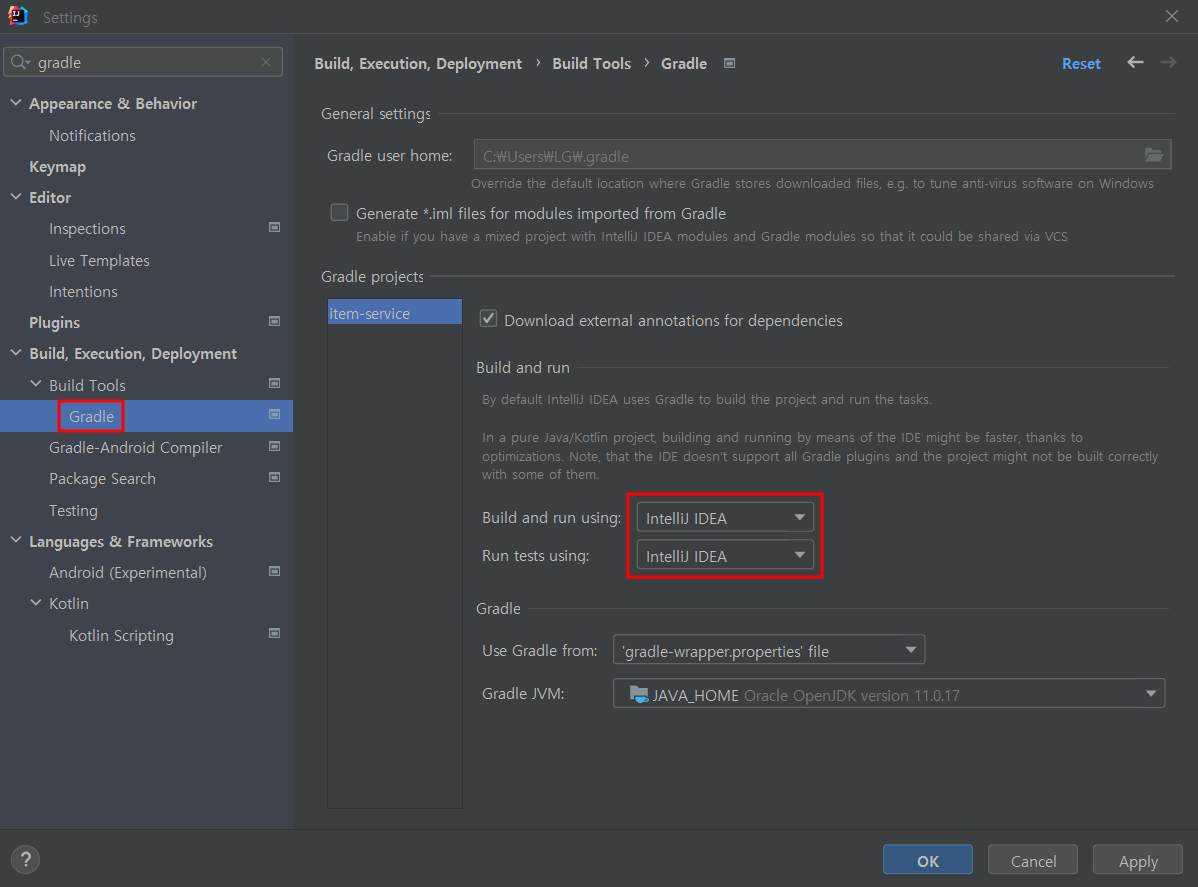
[File] - [Settings] - [Gradle]

Welcome 페이지 추가
/resources/static/index.html
<!DOCTYPE html>
<html>
<head>
    <meta charset="UTF-8">
    <title>Title</title>
</head>
<body>
<ul>
    <li>상품 관리
        <ul>
            <li><a href="/basic/items">상품 관리 - 기본</a></li>
        </ul>
    </li>
</ul>
</body>
</html>
동작 확인
기본 메인 클래스 실행 ( SpringmvcApplication.main() )
http://localhost:8080 호출해서 Welcome 페이지가 나오면 성공
요구사항 분석
상품을 관리할 수 있는 서비스를 만들어보자.
상품 도메인 모델
- 상품 ID
- 상품명
- 가격
- 수량
상품 관리 기능
- 상품 목록
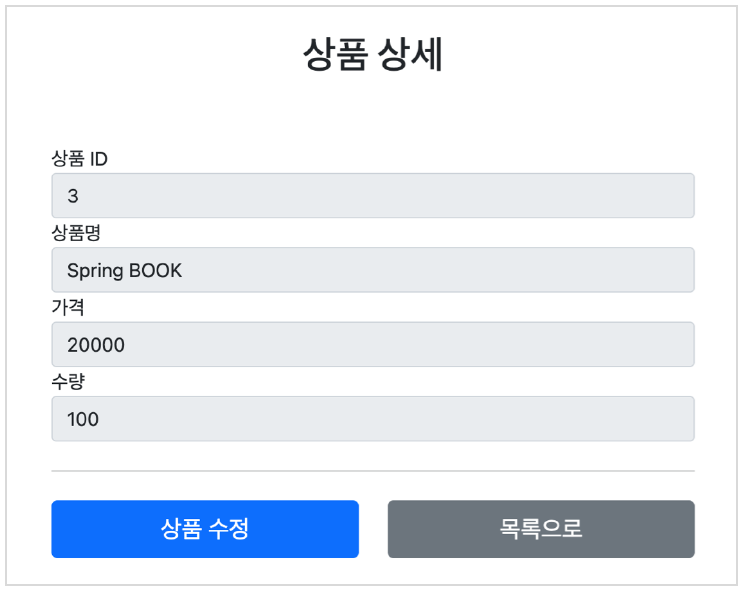
- 상품 상세
- 상품 등록
- 상품 수정
서비스 화면


서비스 제공 흐름

요구사항이 정리되고 디자이너, 웹 퍼블리셔, 백엔드 개발자가 업무를 나누어 진행한다.
- 디자이너: 요구사항에 맞도록 디자인하고, 디자인 결과물을 웹 퍼블리셔에게 넘겨준다.
- 웹 퍼블리셔: 다자이너에서 받은 디자인을 기반으로 HTML, CSS를 만들어 개발자에게 제공한다.
- 백엔드 개발자: 디자이너, 웹 퍼블리셔를 통해서 HTML 화면이 나오기 전까지 시스템을 설계하고, 핵심 비즈니스 모델을 개발한다. 이후 HTML이 나오면 이 HTML을 뷰 템플릿으로 변환해서 동적으로 화면을 그리고, 또 웹 화면의 흐름을 제어한다.
> 참고
React, Vue.js 같은 웹 클라이언트 기술을 사용하고, 웹 프론트엔드 개발자가 별도로 있으면, 웹 프론트엔드
개발자가 웹 퍼블리셔 역할까지 포함해서 하는 경우도 있다.
웹 클라이언트 기술을 사용하면, 웹 프론트엔드 개발자가 HTML을 동적으로 만드는 역할과 웹 화면의 흐름을
담당한다. 이 경우 백엔드 개발자는 HTML 뷰 템플릿을 직접 만지는 대신에, HTTP API를 통해 웹 클라이언트
가 필요로 하는 데이터와 기능을 제공하면 된다.
상품 도메인 개발
Item - 상품 객체 [Alt] + [Insert] 단축키
package hello.itemservice.domain.item;

import lombok.Data;

@Data  // 쓸 때 주의해야 함
public class Item {

    private Long id;
    private String itemName;
    private Integer price;
    private Integer quantity;

    public Item(){
    }

    public Item(String itemName, Integer price, Integer quantity) {
        this.itemName = itemName;
        this.price = price;
        this.quantity = quantity;
    }
}
ItemRepository - 상품 저장소
package hello.itemservice.domain.item;

import org.springframework.stereotype.Repository;

import java.util.ArrayList;
import java.util.HashMap;
import java.util.List;
import java.util.Map;

@Repository  // @ComponentScan 대상이 됨
public class ItemRepository {

    private static final Map<Long, Item> store = new HashMap<>();  // static 사용
    private static long sequence = 0L;  // static 사용

    public Item save(Item item) {
        item.setId(++sequence);
        store.put(item.getId(), item);
        return item;
    }

    public Item findById(Long id) {
        return store.get(id);
    }

    public List<Item> findAll() {
        return new ArrayList<>(store.values());
    }

    public void update(Long itemId, Item updateParam) {
        Item findItem = findById(itemId);
        findItem.setItemName(updateParam.getItemName());
        findItem.setPrice(updateParam.getPrice());
        findItem.setQuantity(updateParam.getQuantity());
    }

    public void clearStore() {
        store.clear();;
    }
}
ItemRepositoryTest - 상품 저장소 테스트 [Ctrl] + [Shift] + [T] 단축키
package hello.itemservice.domain.item;

import org.junit.jupiter.api.AfterEach;
import org.junit.jupiter.api.Test;

import java.util.List;

import static org.assertj.core.api.Assertions.assertThat;

class ItemRepositoryTest {

    ItemRepository itemRepository = new ItemRepository();

    @AfterEach
    void afterEach() {
        itemRepository.clearStore();
    }

    @Test
    void save() {
        // given
        Item item = new Item("itemA", 10000, 10);

        // when
        Item savedItem = itemRepository.save(item);

        // then
        Item findItem = itemRepository.findById(item.getId());
        assertThat(findItem).isEqualTo(savedItem);
    }

    @Test
    void findAll() {
        // given
        Item item1 = new Item("item1", 10000, 10);
        Item item2 = new Item("item2", 20000, 20);

        itemRepository.save(item1);
        itemRepository.save(item2);

        // when
        List<Item> result = itemRepository.findAll();

        // then
        assertThat(result.size()).isEqualTo(2);
        assertThat(result).contains(item1, item2);
    }

    @Test
    void updateItem() {
        // given
        Item item = new Item("itemA", 10000, 10);

        Item savedItem = itemRepository.save(item);
        Long itemId = savedItem.getId();

        // when
        Item updateParam = new Item("itemB", 20000, 20);
        itemRepository.update(itemId, updateParam);

        // then
        Item findItem = itemRepository.findById(itemId);

        assertThat(findItem.getItemName()).isEqualTo(updateParam.getItemName());
        assertThat(findItem.getPrice()).isEqualTo(updateParam.getPrice());
        assertThat(findItem.getQuantity()).isEqualTo(updateParam.getQuantity());
    }
}
상품 서비스 HTML
핵심 비즈니스 로직을 개발하는 동안, 웹 퍼블리셔는 HTML 마크업을 완료했다.
다음 파일들을 경로에 넣고 잘 동작하는지 확인해보자.
부트스트랩
참고로 HTML을 편리하게 개발하기 위해 부트스트랩 사용했다.
먼저 필요한 부트스트랩 파일을 설치하자
부트스트랩 공식 사이트: https://getbootstrap.com
Bootstrap
Powerful, extensible, and feature-packed frontend toolkit. Build and customize with Sass, utilize prebuilt grid system and components, and bring projects to life with powerful JavaScript plugins.
getbootstrap.com
부트스트랩을 다운로드 받고 압축을 풀자.
- 이동: https://getbootstrap.com/docs/5.0/getting-started/download/
- Compiled CSS and JS 항목을 다운로드하자.
- 압축을 출고 bootstrap.min.css 를 복사해서 다음 폴더에 추가하자
- resources/static/css/bootstrap.min.css
> 참고
부트스트랩(Bootstrap)은 웹사이트를 쉽게 만들 수 있게 도와주는 HTML, CSS, JS 프레임워크이다. 하나의
CSS로 휴대폰, 태블릿, 데스크탑까지 다양한 기기에서 작동한다. 다양한 기능을 제공하여 사용자가 쉽게 웹
사이트를 제작, 유지, 보수할 수 있도록 도와준다. - 출처: 위키백과
HTML, css 파일
/resources/static/css/bootstrap.min.css => 부트스트랩 다운로드
/resources/static/html/items.html
/resources/static/html/item.html
/resources/static/html/addForm.html
/resources/static/html/editForm.html
참고로 /resources/static 에 넣어두었기 때문에 스프링 부트가 정적 리소스를 제공한다.
http://localhost:8080/html/items.html
그런데 정적 리소스여서 해당 파일을 탐색기를 통해 직접 열어도 동작하는 것을 확인할 수 있다.
> 참고
이렇게 정적 리소스가 공개되는 /resources/static 폴더에 HTML을 넣어두면, 실제 서비스에서도 공개된다.
서비스를 운영한다면 지금처럼 공개할 필요없는 HTML을 두는 것은 주의하자.
상품 목록 HTML
resources/static/html/items.html
<!DOCTYPE HTML>
<html>
<head>
    <meta charset="utf-8">
    <link href="../css/bootstrap.min.css" rel="stylesheet">
</head>
<body>


<div class="container" style="max-width: 600px">
    <div class="py-5 text-center">
        <h2>상품 목록</h2>
    </div>


    <div class="row">
        <div class="col">
            <button class="btn btn-primary float-end" onclick="location.href='addForm.html'" type="button">상품
                등록</button>
        </div>
    </div>


    <hr class="my-4">
    <div>
        <table class="table">
            <thead>
            <tr>
                <th>ID</th>
                <th>상품명</th>
                <th>가격</th>
                <th>수량</th>
            </tr>
            </thead>
            <tbody>
            <tr>
                <td><a href="item.html">1</a></td>
                <td><a href="item.html">테스트 상품1</a></td>
                <td>10000</td>
                <td>10</td>
            </tr>
            <tr>
                <td><a href="item.html">2</a></td>
                <td><a href="item.html">테스트 상품2</a></td>
                <td>20000</td>
                <td>20</td>
            </tr>
            </tbody>
        </table>
    </div>


</div> <!-- /container -->


</body>
</html>
상품 상세 HTML
resources/static/html/item.html
<!DOCTYPE HTML>
<html>
<head>
    <meta charset="utf-8">
    <link href="../css/bootstrap.min.css" rel="stylesheet">
    <style>
        .container {
            max-width: 560px;
        }
    </style>
</head>
<body>


<div class="container">


    <div class="py-5 text-center">
        <h2>상품 상세</h2>
    </div>


    <div>
        <label for="itemId">상품 ID</label>
        <input type="text" id="itemId" name="itemId" class="form-control" value="1" readonly>
    </div>
    <div>
        <label for="itemName">상품명</label>
        <input type="text" id="itemName" name="itemName" class="form-control" value="상품A" readonly>
    </div>
    <div>
        <label for="price">가격</label>
        <input type="text" id="price" name="price" class="form-control" value="10000" readonly>
    </div>
    <div>
        <label for="quantity">수량</label>
        <input type="text" id="quantity" name="quantity" class="form-control" value="10" readonly>
    </div>


    <hr class="my-4">


    <div class="row">
        <div class="col">
            <button class="w-100 btn btn-primary btn-lg" onclick="location.href='editForm.html'" type="button">상품 수정</button>
        </div>
        <div class="col">
            <button class="w-100 btn btn-secondary btn-lg"
                    onclick="location.href='items.html'" type="button">목록으로</button>
        </div>
    </div>


</div> <!-- /container -->
</body>
</html>
상품 등록 폼 HTML
resources/static/html/addForm.html
<!DOCTYPE HTML>
<html>
<head>
  <meta charset="utf-8">
  <link href="../css/bootstrap.min.css" rel="stylesheet">
  <style>
    .container {
      max-width: 560px;
    }
  </style>
</head>
<body>


<div class="container">


  <div class="py-5 text-center">
    <h2>상품 등록 폼</h2>
  </div>


  <h4 class="mb-3">상품 입력</h4>


  <form action="item.html" method="post">
    <div>
      <label for="itemName">상품명</label>
      <input type="text" id="itemName" name="itemName" class="form-control" placeholder="이름을 입력하세요">
    </div>
    <div>
      <label for="price">가격</label>
      <input type="text" id="price" name="price" class="form-control" placeholder="가격을 입력하세요">
    </div>
    <div>
      <label for="quantity">수량</label>
      <input type="text" id="quantity" name="quantity" class="form-control" placeholder="수량을 입력하세요">
    </div>


    <hr class="my-4">


    <div class="row">
      <div class="col">
        <button class="w-100 btn btn-primary btn-lg" type="submit">상품
          등록</button>
      </div>
      <div class="col">
        <button class="w-100 btn btn-secondary btn-lg" onclick="location.href='items.html'" type="button">취소</button>
      </div>
    </div>


  </form>


</div> <!-- /container -->
</body>
</html>
상품 수정 폼 HTML
resources/static/html/editForm.html
<!DOCTYPE HTML>
<html>
<head>
  <meta charset="utf-8">
  <link href="../css/bootstrap.min.css" rel="stylesheet">
  <style>
    .container {
      max-width: 560px;
    }
  </style>
</head>
<body>


<div class="container">


  <div class="py-5 text-center">
    <h2>상품 수정 폼</h2>
  </div>


  <form action="item.html" method="post">
    <div>
      <label for="id">상품 ID</label>
      <input type="text" id="id" name="id" class="form-control" value="1"
             readonly>
    </div>
    <div>
      <label for="itemName">상품명</label>
      <input type="text" id="itemName" name="itemName" class="form-control" value="상품A">
    </div>
    <div>
      <label for="price">가격</label>
      <input type="text" id="price" name="price" class="form-control" value="10000">
    </div>
    <div>
      <label for="quantity">수량</label>
      <input type="text" id="quantity" name="quantity" class="form-control" value="10">
    </div>


    <hr class="my-4">

    <div class="row">

      <div class="col">
        <button class="w-100 btn btn-primary btn-lg" type="submit">저장
        </button>
      </div>
      <div class="col">
        <button class="w-100 btn btn-secondary btn-lg" onclick="location.href='item.html'" type="button">취소</button>
      </div>
    </div>


  </form>


</div> <!-- /container -->
</body>
</html>
'Spring > 스프링 MVC 1편' 카테고리의 다른 글
| 7. 스프링 MVC - 웹 페이지 만들기(3) (0) | 2023.02.14 |
|---|---|
| 7. 스프링 MVC - 웹 페이지 만들기(2) (0) | 2023.02.14 |
| 6. 스프링 MVC - 기본 기능(3) (0) | 2023.02.10 |
| 6. 스프링 MVC - 기본 기능(2) (0) | 2023.02.09 |
| 6. 스프링 MVC - 기본 기능(1) (0) | 2023.02.09 |


